Author: teacher-chef

Pickled [Deviled] Eggs

Pickled [Deviled] Eggs

A few years ago I made Pickled Beets and my parents told me that they hated pickled beets, but since through the years I was forced to try lots of things that I said I didn’t like – I told them they had to try it. Guess What… they liked it! I figured since at Passover (or Easter!!) we always have hard-boiled eggs and my whole family now likes pickled beets, why not combine the two!?

Chocolate Covered Caramel Matzo

Chocolate Covered Caramel Matzo

Every year since I can remember, Chocolate Covered Matzo graced our Passover table. We always bought it but in recent years 1/2 of the pieces in the package were no longer full pieces of matzo but were broken into small pieces. Having smaller pieces is 

Chocolate Cake Cheesecake

Chocolate Cake Cheesecake

ITS RICH’S BIRTHDAY!

Chocolate Cheesecake Cake - layers in motion

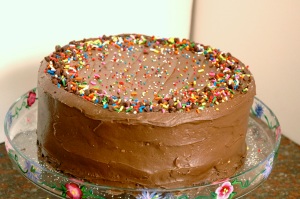
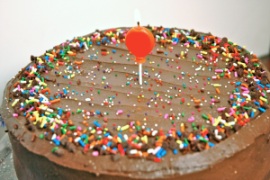
The is just one problem with loving to cook, starting a food blog, improving your cooking skills, and dating someone who loves to eat my cooking. That is: when I offer the world for his birthday, he decided to take it and challenge me to get an awesome birthday cake this year. I love a challenge, so was ready to try making Chocolate Cake Cheesecake (you know kinda like the Cheesecake Factory’s classic dessert) when that was what Rich requested. After some Foodgawker searching I found Erin’s Food Files version that she recently made and decided I was up for this birthday challenge. Since last weekend I made a chocolate-peanut butter cake (and Rich didn’t want a peanut butter frosting) I decided to search for a different frosting (Rich requested a fudge-like chocolate frosting) and decided to roughly base my frosting on Beantown Baker’s Chocolate Frosting.

pre-frosted cake or oversized Oreo!?

cake plate hand-painted by my wonderfully talented Aunt Pat

Be sure to set aside some time (cheesecake the day before) to make this cake – but once all of your parts are ready it is a fast assembly! The cheesecake layer is nice and smooth not a super solid cheesecake so it fits perfectly with the soft layers of the cake. Feel free to decorate however you want (I went with sprinkles since it was a birthday!) and just enjoy this cake for a special occasion [or whatever].

Happy Birthday Rich

RECIPE

Recipes adapted from Erin’s Food Files & Beantown Baker

CHEESECAKE:

  • 1 1/4 pounds bar cream cheese (20 oz), room temperature
  • 3/4 cups sugar
  • 1/2 tablespoon vanilla extract
  • 1/4 teaspoon coarse salt
  • 2 large eggs
  • 1/2 cup sour cream

Preheat oven to 325 degrees. Boil a pot of water. Using an electric mixer, beat cream cheese on medium until fluffy, scraping down side of bowl. Gradually add sugar, beating until fluffy. Beat in vanilla extract and salt. Beat in eggs, one at a time, scraping down side of bowl after each addition. Beat in sour cream.

Cut parchment paper in a circle and line the bottom of the cheesecake pan. Wrap bottom half of pan in foil. Pour in filling; place in a roasting pan. Pour in boiling water to come halfway up side of springform. Bake until just set in center, about 45 minutes. Remove pan from water; let cool 20 minutes. Run a paring knife around edge; let cool completely. Cover; chill overnight, then on day 2 take out of the springform (leaving bottom on) and wrap in plastic wrap and freeze.

CAKE:

  • Butter, for greasing the pans
  • 1 3/4 cups all-purpose flour [plus more for pans]
  • 2 cups sugar
  • 3/4 cups good cocoa powder
  • 2 teaspoons baking soda
  • 1 teaspoon baking powder
  • 1 teaspoon kosher salt
  • 1 cup buttermilk, shaken
  • 1/2 cup vegetable oil
  • 2 extra-large or large eggs, at room temperature
  • 1 teaspoon pure vanilla extract
  • 1 cup freshly brewed hot coffee OR Guinness warmed up (since Rich loves our Guinness cake but it not a coffee drinker)

Preheat the oven to 350 degrees F. Butter 2 (9-inch) round cake pans. Line with parchment paper, then butter and flour the pans.

Sift the flour, sugar, cocoa, baking soda, baking powder, and salt into the bowl of an electric mixer fitted with a paddle attachment and mix on low speed until combined. In another bowl, combine the buttermilk, oil, eggs, and vanilla. With the mixer on low speed, slowly add the wet ingredients to the dry. With mixer still on low, add the coffee and stir just to combine, scraping the bottom of the bowl with a rubber spatula. Pour the batter into the prepared pans and bake for 35 to 40 minutes, until a cake tester comes out clean. Cool in the pans for 30 minutes, then turn them out onto a cooling rack and cool completely.

FROSTING:

  • 8 Tbsp butter (1 stick)
  • 4 oz cream cheese (1/2 a block)
  • 2 tsp vanilla extract
  • 4 cups powdered sugar
  • 1/2 cup dark cocoa powder
  • 1/3 cup milk (or Baileys) – I did a 50/50 mix & used Vanilla Almond Milk

Cream butter and cream cheese and vanilla. In a separate bowl, combine powdered sugar and cocoa powder. Add dry ingredients to creamed mixture. Slowly add milk until frosting reaches desired consistency, then beat another 5 minutes until creamy.

ASSEMBLY
Place first layer of cake on cake stand. If desired, frost with a little frosting. Remove cheesecake from freezer, unwrap, and remove from metal bottom of the pan, then be sure to peel off parchment paper. Place cheesecake layer on top of the cake. If the cheesecake is wider than the cake & its necessary to to trim it, wait approximately 10 minutes for the cheesecake to soften, then trim it with a knife. Place top layer of cake on top of the cheesecake, and coat with a layer of frosting (crumb coat). Refrigerate approximately 30 minutes, then frost the remaining frosting. Top with shaved chocolate, chocolate chips, or decoration of your choosing. Refrigerate until ready to serve.

... make a wish
April 11 is National Fondue Day

April 11 is National Fondue Day

 … like you really need an excuse to eat warm melty cheese!? I love my Food Holiday Reference and when I saw that this past Monday was National Fondue Day – how could I resist (although we celebrated a belated Fondue Day and waited until 

Foodgawker First!

Foodgawker First!

*Happy Dance* I FINALLY had a blog post accepted by Foodgawker! I have been taking photos for quite a while and thought that they were looking pretty good, even though my wonderfully talented NJ Wedding Photographer boyfriend kept telling me they were underexposed & not lit 

Chocolate Peanut Butter layer celebration cake

Chocolate Peanut Butter layer celebration cake

“The best gifts come from the heart”

This “gift cake” was made for Rich’s mother for her birthday. I knew she loved Chocolate & Peanut Butter so when I came across this cake – I knew I had found the winner!
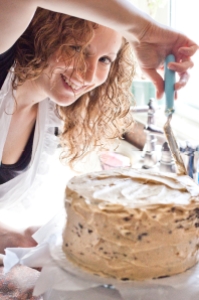
4-9 decorating cake with NJ Wedding Photography, Alborn Photography

And then when I started to think about cakes, I realized that I have never made a layer cake (besides mini ones) before in my life – so making this present was a good lesson for me as well. Rich photographed the whole process & all pictures in this post are courtesy of Alborn Photography, (you can visit him on Facebook, NJ Wedding Photographer too)!

Peanut Butter Cake, photograph by Alborn Photography

“It’s the thought that counts”

The road of life takes us where it wants to. AND, that unfortunately meant that this time the road was not to celebrate with this cake this weekend… You see we had to travel from Pennsylvania to Delaware to celebrate and along the way we took the turnpike. Well, on the PA Turnpike there was a deer who was out for a late afternoon frolic and after he high-jumped the median his head & body made contact with the front of our car! This being said: the poor guy’s frolicking days are over, we have a banged up car, broken radiator, trip in the tow truck, amazing friends who picked us up, & no birthday celebration (yet) with Rich’s mom! Although: when you think deer + car you think major damage & this guys somehow managed to keep the car (and us, most importantly) almost un-harmed (although after the insurance & dealership check out the car & give us a total we will see exactly how much damage was done).

4-9 cake cut, photo by Alborn Photography

BUT, we had this amazing cake (which somehow survived the deer incident & tow truck) that was going to go to waste if we didn’t enjoy it. Enter said friends and amazing neighbors: all who would (and do) do anything for us. We decided to share this cake with them and invited them over to sing & email happy birthday to Rich’s Mom, and thank them for everything they do for us all the time. THANK YOU to our wonderful friends & family (and there are currently huge chunks, like about 1/2 a cake) in the freezer to share with Rich’s parents when we see them and my folks when they return home)!

Cake + Life = Adventure!

Recipe

Recipe as found on Sugar Cooking, another Teacher-Chef!

Chocolate Cake

  • 2 cups all-purpose flour
  • 2 1/2 cups sugar
  • 3/4 cup unsweetened cocoa powder
  • 2 teaspoons baking soda
  • 1 teaspoon salt
  • 1 cup neutral vegetable oil
  • 1 cup sour cream
  • 1 1/2 cups water
  • 2 tablespoons distilled white vinegar
  • 1 teaspoon vanilla extract
  • 2 eggs

Preheat the oven to 350 degrees F. Butter the bottoms and sides of three 8-inch round cake pans. Line the bottom of each pan with a round of parchment or waxed paper and butter the paper.

Sift the flour, sugar, cocoa powder, baking soda, and salt into a large bowl. Whisk to combine them well. Add the oil and sour cream and whisk to blend. Gradually beat in the water. Blend in the vinegar and vanilla. Whisk in the eggs and beat until well blended. Scrape down the sides of the bowl and be sure the batter is well mixed. Divide among the 3 prepared cake pans.

Bake for 30 to 35 minutes, or until a cake tester or wooden toothpick inserted in the center comes out almost clean. Let cool in the pans for about 20 minutes. Invert onto wire racks, carefully peel off the paper liners, and let cool completely. *(Note from recipe originator Deb: These cakes are very, very soft. They are a lot easier to work with after firming them up in the freezer for 30 minutes. They’ll defrost quickly once assembled. You’ll be glad you did this, trust me.)

Peanut Butter Frosting
Makes about 5 cups

  • 10 ounces cream cheese, at room temperature
  • 1 stick (4 ounces) unsalted butter, at room temperature
  • 5 cups confectioners’ sugar, sifted
  • 2/3 cup smooth peanut butter

In a large bowl with an electric mixer, beat the cream cheese and butter until light and fluffy. Gradually add the confectioners’ sugar 1 cup at a time, mixing thoroughly after each addition and scraping down the sides of the bowl often. Continue to beat on medium speed until light and fluffy, 3 to 4 minutes. Add the peanut butter and beat until thoroughly blended.

FROST THE CAKE: place one layer, flat side up, on a cake stand or large serving plate. Spread 2/3 cup cup of the Peanut Butter Frosting evenly over the top. Repeat with the next layer. Place the last layer on top and frost the top and sides of the cake with the remaining frosting. Once the cake is fully frosted, it helps to chill it again and let it firm up. The cooler and more set the peanut butter frosting is, the better drip effect you’ll get from the Chocolate-Peanut Butter Glaze.

Chocolate-Peanut Butter Glaze
Makes about 1 1/2 cups

  • 6 ounces seimsweet chocolate, coarsely chopped
  • 3 tablespoons smooth peanut butter
  • 2 tablespoons light corn syrup
  • 1/2 cup half-and-half

In the top of a double boiler or in a bowl set over simmering water, combine the chocolate, peanut butter, and corn syrup. Cook, whisking often, until the chocolate is melted and the mixture is smooth. Remove from the heat and whisk in the half-and-half, beating until smooth. Use while still warm.

DECORATE using the Chocolate–Peanut Butter Glaze: pour the glaze over the top of the cake, and using an offset spatula, spread it evenly over the top just to the edges so that it runs down the sides of the cake in long drips. Decorate the top with chopped peanuts OR pretzels in today’s salty alternative version. Refrigerate, uncovered, for at least 30 minutes to allow the glaze and frosting to set completely. Remove about 1 hour before serving.

Enjoy the road of life & wear your seatbelt!