Tag: food

Borsht: Chilled Beet & Tomato Soup

Borsht: Chilled Beet & Tomato Soup

Survey says: Rich thought it was a little “earthy tasting” (but he hates beets). My Grandmother called me when she was eating the leftovers I gave her and was “Oohing & Aahhing” over it (love you Grandma). Mom & Dad were both very impressed & thought it was better than they were expecting!

Oven Roasted Garlic Tomatoes

Oven Roasted Garlic Tomatoes

This is SO simple and easy – roast up some fresh tomatoes with garlic, olive oil, & salt and you have your sauce. The only “work” to this is planning an hour ahead to roast up your tomatoes. So what are you waiting for – enjoy the flavors of summer and enjoy!!

“Classic” Chocolate Whoopie Pie

“Classic” Chocolate Whoopie Pie

Rich LOVES Whoopie Pies. His mom picks them up for him every time we have a trip to the lake & she gets them from a small Amish Bakery stand. The stakes were high so I have avoided making him Whoopie Pies for quite a while now…

Thanks to Sweet Pea for coming through though, on a recipe I knew would work….

Rich’s analysis is as follows the cake “kicks the Amish Cake’s butt” but the filling was “awesome, but a little lighter in texture”. I think that next time I might try to make a variation of my S’mores Cupcake Frosting with the addition of some meringue powder to fluff it more?

There are so many different variations of Whoopie Pies, and they are quickly becoming more and more popular! They are super easy to make & travel well (especially since I wrap them each individually and they can even be frozen to last longer). These travel much more easily than cupcakes (but not as easily as bar cookies). They may not be quite as fancy as this awesome cake or this cake or even this cake – but I think most everyone (besides dad) will love them just as much. I’m willing to continue experimenting, any ideas?

Chocolate Whoopie Pie

makes 24 2″ pies – or about 15 3″ ones (like I did)

  • 1 ⅔ cups all-purpose flour
  • ⅔ cup unsweetened cocoa powder
  • 1½ teaspoons baking soda
  • ½ teaspoon salt
  • 4 tablespoons unsalted butter, at room temperature
  • 4 tablespoons vegetable shortening
  • 1 cup (packed) dark brown sugar
  • 1 large egg
  • 1 teaspoon pure vanilla extract
  • 1 cup milk

Preheat to 375°. Line two baking sheets with parchment paper.

In a medium bowl, mix together the flour, cocoa powder, baking soda and salt. In the bowl of a stand mixer fitted with the paddle attachment, beat together the butter, shortening and brown sugar on low speed until just combined. Increase the speed to medium and beat until fluffy and smooth, about 3 minutes.

Add the egg and vanilla and beat for another 2 minutes. Add half of the flour mixture and half of the milk to the batter and beat on low until incorporated. Add the remaining flour mixture and milk and beat until combined. Drop by tablespoons of batter onto the prepared baking sheets at least 2 inches apart

Bake one sheet at a time for about 10 minutes each, or until the rounds spring back when pressed gently. Remove from the oven and let the cakes cool in the pan for 5 minutes before transferring them to a rack to cool completely.
  • 1 1/2 cups Marshmallow Fluff
  • 1 1/4 cups vegetable shortening
  • 1 cup confectioners sugar
  • 1 tablespoon vanilla extract

To make the filling: In the bowl of a stand mixer fitted with the paddle attachment, beat together the marshmallow fluff and the vegetable shortening, on medium speed until the mixture is smooth and fluffy, about 3 minutes. Add the confectioners’ sugar and the vanilla and beat on low until incorporated. Increase mixer speed to medium and beat until fluffy, about 3 minutes more.

Using a knife or spoon, spread the filling onto the flat side of a cooled cake. Top with another cake, flat side down. Repeat with the remaining cakes and serve.

And I leave you with Today’s Questions… what is your favorite dessert to bring with you to feed your loved ones?

Roasted Tomato Soup

Roasted Tomato Soup

IT’S TOMATO SEASON And just in case you don’t believe me – take a look at my counter!! I love tomatoes and at this point I am still enjoying them and all of their bounty (from our garden & the CSA) – so I am 

Tomatillo Salsa

Tomatillo Salsa

Just the other day I was wishing that I had some Tomatillos because I was craving a green salsa! That day just happened to be a Friday and I was getting ready to go over to our CSA. Lo & Behold we got a pound 

Zucchini Baba Ganoush

Zucchini Baba Ganoush

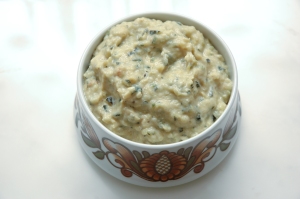
Baba Ganoush is a traditional Mid Eastern dish – similar to Hummus, only instead of being made with Chick Peas – you make it with Eggplant. BUT – cooking is all about being creative, so when life hands you Zucchini you get creative like Hannah did!

We are lucky that our neighbors still like us enough to be sharing their zucchini and other garden goodies (and they are on vacation so we are getting all of their bounty). I am a HUGE fan of Hummus (great after school snack with some veggies) so I had a feeling that I would be really enjoy this. Turn on your oven, roast those veggies, enjoy the smells & get ready to dip!

Zucchini Baba Ganoush

Adapted from Bittersweet Blog – variation of Baba Ganoush

  • 1 1/2 Pounds Zucchini (About 1 – 2 Large or 3 Medium)
  • 6 – 8 Garlic Cloves, Separated From the Head but Not Peeled
  • 1 Tablespoon Olive Oil, Plus Additional to Garnish
  • Pinch [Table] Salt and Black Pepper
  • < 2 Tablespoons Sesame Tahini
  • 2 Tablespoons Lemon Juice
  • 1/4 Teaspoon Ground Cumin
  • 1/4 Teaspoon Smoked Salt (I just used regular salt & a drip or 2 of liquid smoke)

Preheat your oven to 400 degrees, and line a baking sheet with aluminum foil. Slice the zucchini into 1/4-inch thick rounds, spread a little olive oil on the foil, the lay your zucchini in an even (non-overlapping) layer & drizzle some more olive oil & salt/pepper on top of the zucchini. Place the whole cloves of garlic grouped in the center of the sheet so that they don’t burn. Roast for 30 minutes, until the zucchini are nicely browned. Let cool.

Once the vegetables have come to room temperature, peel the garlic cloves, and toss them into your food processor along with the roasted zucchini. Add in the tahini, lemon juice, cumin, and smoked salt. Pulse to combine, until you create a rough and chunky sort of paste. You don’t want it to be smooth. It should take about 5 – 10 pulses.

Sample the tastes & adjust as needed (I should have added a bit more salt, since I didn’t have the right type I suppose). Transfer the finished dip into an air-tight container, and for the best flavor: let it set in the fridge for a few hours (or even better: overnight). Serve with an additional drizzle of olive oil over the top, if desired.

Makes 1 1/2 – 2 Cups

One Year Ago: Sushi @ Home

And I leave you with this, today’s Question of the day… What is your favorite dip or thing to dip?  For Me: depending on the day or my mood I love Hummus or Ranch or Salsa (all with veggies so I don’t feel guilty). So what do you love!?